
Anyway, this is an extensively screenshot-supported guide to soloing the first level of Alien Swarm's Jacob's Rest campaign, Landing Bay. The items it uses are available standard at level 1. The recommended difficulty level is Hard, for the +20% experience bonus. Insane changes the spawn wildly, and is not recommended. Done correctly, you'll get over 1400 experience from a single run.

Marine choice: Vegas
Why Vegas? His Engineering skill is better than Crash's. Engineering speeds up both the setup time for sentry guns and the welding/unwelding process. His melee damage is also better, though that rarely comes into play. Also, a Tech is required for the mission.
Weapon loadout: IAF Advanced Sentry Gun/IAF Advanced Sentry Gun/Hand Welder
Why two Advanced Sentry Guns? Well, that relates to our general tactic, which I'll mention in a bit. Also, you'll need at least one to defend you while you hack at the end of the level.
Why the Hand Welder? After all, there are two of them in the level, next to each of the welded doors that you have to unweld one of to progress through the level. Admittedly, you can take anything you want here. If you're not confident in your ability to solo the level, take a Personal Healing Kit instead. I merely take the Hand Welder so I don't have to swap out for it.
So, how does this thing work? Well, the tactic is really easy. It's not exactly fast, but it's extremely reliable. Simply place an Advanced Sentry Gun (hereafter, sentry) somewhere safe, then go trigger a bunch of aliens to spawn and book it back behind the sentry. If placed correctly, the sentry will shred everything and you will be unscathed. Despite what you may see graphically, the sentry gun we're using does not in fact cause friendly fire damage.
Note that if you take two of any other weapon, they behave slightly differently than taking two of the same sentry. When you double up on a weapon, you get double the clips, and the weapons share ammunition. When you double up on sentries, each sentry has its own ammunition and they don't share it.
Getting through the level is just a matter of knowing where to place and aim the sentries, and where the triggers for enemy spawns are. Sentries use their ammunition most efficiently when you have hordes of enemies coming at them.
This guide assumes your controls are default. If you've changed yours, you'll have to remember this.
It's very important that you follow the route I'm explaining exactly. If you wander around too much, you'll end up triggering one or two of the spawns that this route avoids to conserve sentry ammo. You have been warned.
One last thing before the walkthrough: you'll need to input at least one console command in order to do this. If you don't have the developer console enabled, go into your keyboard settings and enable it with the checkbox at the bottom. Then you can press ` (next to 1 in most keyboard layouts) to open it up.
The first command, and the only one that's required, is asw_ignore_need_two_player_requirement 1. A second command that is only necessary if you want to prevent people from joining your game in progress is sv_lan 1.
Start up Alien Swarm, and enter the console command(s). Then go to Play Online, and select Play With Friends. This will prevent your game from showing up in the public game list. Go to Create New Game, change the difficulty to Hard, and then click Create Game. Set up Vegas with the aforementioned loadout, and click Start Mission.

Once in the mission, run to the first hack, shown above. Go up the stairs to the door I'm standing at, rather than using the other one. Hack the door, and try to do it quickly since you get extra experience (and achievement progress) for it.

Once through the door, place your mouse cursor to the right of Vegas and proceed down both sets of stairs. Immediately upon getting down the last set of stairs, click to place the sentry. You have already gotten the attention of one alien, and the sentry sets up in just enough time to take it out. The screenshot above shows you pretty much exactly how much leeway you get, which is why taking Vegas is essential.


When the first alien is dead, punch the three boxes shown in the left screenshot. The right screenshot shows where you should stand to punch the third crate. In the process, you'll trigger several spawns, so run back behind the sentry. Punching the crates allows the sentry to shoot under the racks at aliens.
Disassemble the sentry, then hit Q to swap back to it. You will want to hit Q every time you finish disassembling a sentry, so that you use the first sentry's ammo before the second sentry's ammo. After this point, it's assumed that you hit Q after disassembling a sentry. Also, the mouse wheel can switch weapons, but I find it to be too sensitive.

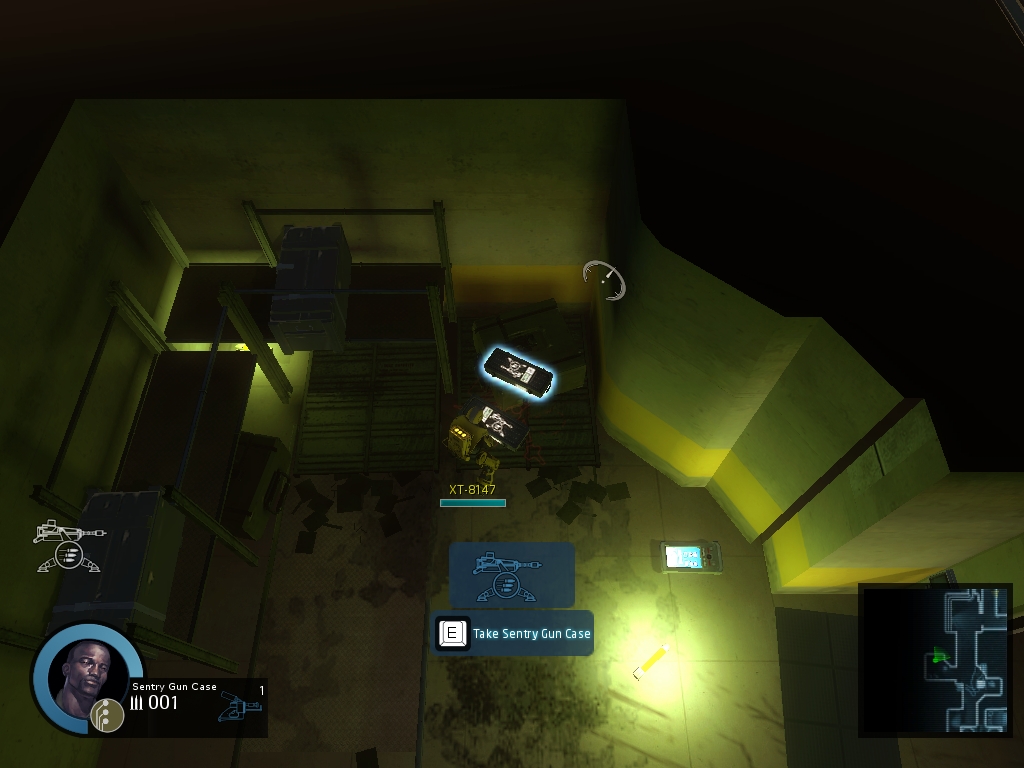
Head north, and once between the racks, immediately turn and head west. Don't go up the stairs. You'll end up in the room shown in the screenshot above. There are two aliens here, though one may not be spawned. To spawn the other one, go back through the door and re-enter the room. Place the sentry as shown, then walk around until you've triggered one or both aliens to come attack. If necessary, go down the stairs, but then go back up again. Once these two are dead, pick up your sentry and move north past the PDA.

Place the sentry in the doorway out of this room, as shown. Aim it at the passageway to the northeast. Now, run up to the stacked crates and then retreat back near the sentry. If you're lucky, you grabbed the attention of both enemies. If not, once the first one is dead, go a bit closer to the northeast passageway and run back. Aliens make a distinctive sound when you've gotten their attention, so listen for it.


Once these two are dead, move the sentry to the northwest corner of the room and aim it at the southeast passage, as shown in the left screenshot. This may seem a little weird, but it's necessary. The next spawn will approach you from behind if you simply try to progress towards the welded doors. Run past the explosive barrel and down the stairs, to the spot shown in the right screenshot. Once you're there, immediately go back up the stairs and run behind the sentry. This spawn is usually three enemies, sometimes four. Occasionally they'll come in through the southern door rather than the southeastern door, but if you have the sentry placed and aimed as shown, it shouldn't matter. When they're all dead, pick up your sentry.
Sometimes, when you trigger the spawn in the room just after the hack, one alien will lag behind and get stuck behind one or both of the northern doors out of that room. These aliens will remain motionless, but will scream at you when you get close. If this has happened to you, place the sentry so that it will get rid of them, and then pick it back up. Once your scanner shows nothing, it's time to move on.


Head north. Go all the way north. Stop just before the final step leading to the door. You want to place the sentry as far back as possible on the upper step, as shown in the left screenshot. Once it's placed and aimed straight at the door, walk up onto the third step and inch forwards until you can unweld the door. The exact position where you should unweld from is shown in the right screenshot. Go through the door, touch the railing, then run behind the sentry. One spawn is triggered just before you reach the door, and two more are triggered on the other side. Wait until they're all dead. Sometimes, one or two will lag behind way north, run out through the door again to get their attention, then let the sentry kill them.

Once your scanner shows nothing (it may in fact show something, there are a bunch of enemies in the southwest corner of the room), pick up your sentry, head through the door, and go a little bit south. Place the sentry as shown, just a bit south of where the railing ends.
Walk down to the southern side of this passage. Put your mouse cursor in the bottom left of your screen and run west. When you trigger some enemies, run back. When the sentry kills them, run forward and trigger more. Repeat this process until your scanner shows nothing. The sentry should be low on ammo at this point. Pick the sentry up and continue.
You can tell if a sentry is low on ammo based on these three things:
- The noise it makes when it fires changes when its ammo gets low.
- When you're near it, the ammo amount will be shown in yellow instead of white.
- There will be a yellow light blinking on it. This light will change to blink red when it's out of ammo entirely. Furthermore, when a sentry is out of ammo, it will stop projecting the laser lines.

Begin to head out of the room through the door to the north, but stop where the railing starts up for the last time. Place the sentry here, as shown. Walk forwards, all the way to the wall at the north. Sometimes, some aliens will break out of the wall, and other times, they won't. If they break out, retreat and let the sentry kill them. Once it's clear, pick up the sentry.


Walk up to the northernmost set of palettes resting against the wall. Place the sentry as shown in the left screenshot, aimed at the door. If the aliens broke out of the wall, it will be closed, otherwise, it will be open. Walk forwards and start to go down the stairs, but then run back behind the sentry. Two aliens will crawl out from under the catwalk, and several more will come from the north in a bit. The sentry you've placed may run out of ammo here, so place the other one back a bit, as shown in the right screenshot, to provide backup if aliens are still alive when it runs out.

Once everything's dead, pick up that no ammo (or very very low ammo) sentry. All it's good for now is blocking the stairs. You see, the aliens can't walk through sentries, but you can. Put your back to the northern wall, and walk east until the railing on the stairs prevents you from going further. Aim straight down and place the sentry here, as shown.

Go back and get the other sentry. Go down onto the lower catwalk. Melee the crate, then put yourself in the corner where the crate was. Place the sentry and aim it at the wall just behind the other sentry. If aimed correctly, the sentry's effect area shown by the blue lasers should cover both the catwalk above and the entire door, as shown. This is the trickiest spawn of the entire run.
Run north, melee the door (optional, you really only need to go three floor tiles north), then run back behind the sentry. Aim west and prepare to melee if need be. The aliens are scared of the 3 foot drop to the catwalk you're on, but occasionally may fall down there and attack you. If timed correctly, you can get the first hit in, and Vegas' melee attack is good enough to one-hit kill them. The reason why the sentry needs to cover the door is occasionally two aliens will spawn from the pipes in the hallway, and you'll need the sentry to be able to take them out.

This one will take a while, but once your scanner shows no movement, pick up the sentry that has ammo. Leave the no ammo one behind (it will definitely be out of ammo at this point). Run north, and unweld the door shown in the left screenshot to open the room and reveal... another sentry! Pick it up.
Continue north. Sometimes there will be an alien out here, so be careful. If it's there, place the sentry. If it runs at you, melee it instead of placing the sentry. If it's all the way up at the northern wall, it won't move unless you get really close, and a second one will spawn shortly after the first one is killed. Sometimes there's also one stuck behind the door, so use your scanner. Once it's safe, go into the final room.

Notice how the floor here is neatly divided into squares? Get in the top row, and creep forwards until you're in the second square over from the door. Place the sentry as shown. Triggering this one is easy, you have a confrontation-free path to the north of where you placed the sentry. Run up there and you should get their attention. Sometimes, one or two will straggle, and hilariously, sometimes one will work its way through the railing and fall down onto the crate below. Get as many of them dead as you can. If one's stuck on the railing, don't worry about it.
Now walk east and get the attention of the aliens up on the platform. Run back to the sentry. When it stops firing, go back over and see if the platform is clear. If not, get any remaining aliens' attention and run back to the sentry. Once that's done, pick up the sentry. If there was an alien from the first group stuck on the railing, place the sentry so that it will get taken out, then pick it back up. Repeat if an alien got stuck up above, sometimes that happens.


Now that your scanner should be showing nothing, it's time to set up your hacking defense. On the catwalk to the west of the platform, place the sentry as shown in the left screenshot, so that its front legs are about three squares north of where the catwalk starts. Go up onto the platform. Stand next to the pile of dead bodies and place the sentry. The right screenshot shows the exact positioning and aim point you'll need. Hit E once or twice when the sentry is assembled to make sure it's aiming exactly at that point. If you look at the lasers, you'll notice that they indicate that the sentry will cover both sets of stairs.
With your sentries in place, it's time to hack. Speed is of the essence here, as enemies will spawn endlessly until you complete the hack. Luckily, the hack is fairly simple, even if you're not familiar with playing Tech, you should get it pretty easily. Line up the ones so that they're all moving the same direction.

Once the window goes away, move to the sentry just south of you on the platform. Once enemies stop being killed by it, aim it at the door to the east (as shown), which aliens should be in the process of knocking down. When it's knocked down, they'll get taken out by the sentry. If any get through somehow, be ready to melee. Once the noise dies down, run down the hallway and through the door to finish the level.

If you got the first hack quickly (the wire hack), and didn't take any damage or have to melee anything, you'll get exactly 1470 experience. This figure can vary somewhat, but should be over 1400 unless you took too much damage.

There you go. You've now soloed Landing Bay on Hard, entirely with equipment that's available at level 1.
No comments:
Post a Comment
I moderate comments because when Blogger originally implemented a spam filter it wouldn't work without comment moderation enabled. So if your comment doesn't show up right away, that would be why.